
I saw a blog post the other day about printing images to the Linux Terminal in 9 lines of Ruby The results were quite interesting so I thought to myself that it might be a fun little exercise to duplicate this utility in C#. After all, I thought to myself, if you can do it in 9 lines of ruby you must be able to do it in a dozen or so lines of C#. I was wrong.
There are two things that make the ruby version so short: The availability of libraries to do the hard work and the capabilities of the Linux Terminal.
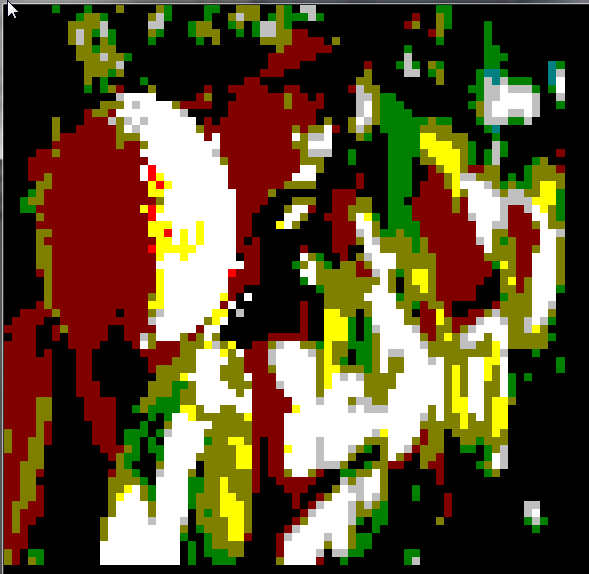
The modern Linux terminal is a pretty complicated beast. Most GUIs support 256 colors and have a lot of features like fonts that make a utility like this quite nice and easy to use. The Windows Command Prompt, on the other hand, isn’t in the same ballpark as the Linux Terminal. It isn’t even in the same league. We run into some problems immediately because the CMD prompt only supports 16 colors, where each color is 4 bits wide. One bit each for red, green and blue, and a bit for light and dark. One consequence of this is that there are 4 colors on the greyscale: Black, DarkGrey (Black + bright), Grey and White (Grey + bright). For every other color there are just two, a dark and a bright. The six hues that you can use are Magenta, Red, Yellow, Green, Cyan, and Blue, with two shades of each. Trying to convert a full RGB color image into this palette, which still clocks in at much worse than 9 lines of code, produces miserable results. Here’s a quick and dirty example:
public static void Main(string[] args)
{
	Bitmap bmp = LoadAndResizeImage(args[0]);
	for (int i = 0; i < bmp.Size.Height; i++)
	{
		Console.SetCursorPosition(0, i);
		for (int j = 0; j < bmp.Size.Width; j++)
		{
			ConsoleColor cc = ConvertColor(bmp.GetPixel(j, i));
			Console.BackgroundColor = cc;
			Console.Write(' ');
		}
	}
}

public static ConsoleColor ConvertColor(Color c)
{
	int cc = (c.R > 128 | c.G > 128 | c.B > 128) ? 8 : 0; // Bright bit set, if any colors are bright
    cc |= (c.R > 64) ? 4 : 0; // R
    cc |= (c.G > 64) ? 2 : 0; // G
    cc |= (c.B > 64) ? 1 : 0; // B
    return (System.ConsoleColor)cc;
}
For each “pixel” of the image, we do a straight-forward conversion to the closest palette color, set that color as the background, and print a space. This is the simple version, but it clearly doesn’t do what we need. Frankly, the images produced look terrible. For your viewing pleasure, here’s a rendering of some peaches on a tree:
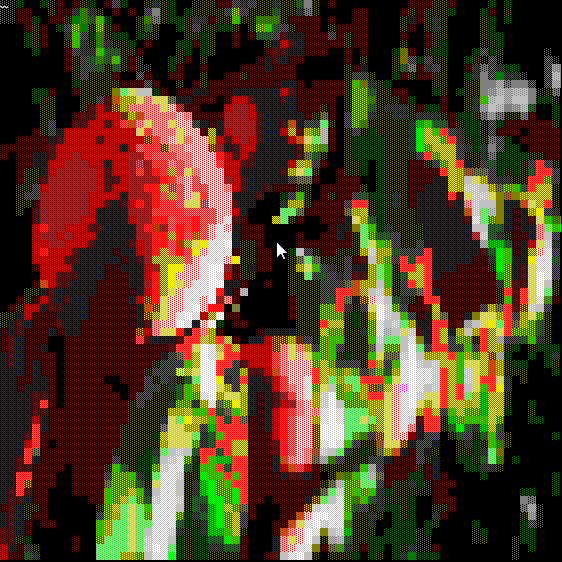
A eureka moment comes when we realize that we can have a second Foreground color, apply that to some kind of printable character, and print that character on top of our colored background. This is sort of like how traditional “ASCII Art” works, by printing ASCII characters to represent shades. In normal ASCII Art, those shades are usually just black-on-white for a grayscale effect. But, this isn’t all we are limited to. By picking the right characters, we can produce a very low-resolution blending effect. The next question is, how do we do this blending? Extended ASCII (code page 1252) provides 5 characters which are worth looking at: 0x20 (space, 0% coverage), 0xB0 (25% coverage block), 0xB1 (50% coverage block), 0xB2 (75% coverage block) and 0xDB (100% coverage block). An astute observer will realize that a foreground with 100% coverage produces exactly the same effect as that background color with 0% coverage. Keeping that detail in mind, we have only 3 “shades” that we can use to blend between individual pairs of colors. Here are some generated “pixels” using blending, showing progression of pure colors from dark to light, a “color wheel” showing dark-to-light and blending between neighboring colors, and an example of how we convert these “pixels” to RGB values:

It’s worth noting that we could have more colors, but many of the additional combinations of non-adjacent colors (Red-Green, Blue-Yellow, etc) don’t produce colors which add value, and which calculate down to RGB values which are functionally identical to other, more attractive, blends. That is, a Red-Green combo looks brownish, but isn’t a better brown than the dark yellow blends. Many of the diagonal combinations of Bright blended with Dark (bright cyan blended with dark blue, etc) don’t produce colors that are usable or unique either.
Since there are relatively few of these “pixels” worth generating, we can create and cache the whole list up front. Then when we want to match a color from an image, we can calculate distances and find the color pixel with the shortest distance to the target color.
public static double DistanceTo(this Color c, Color p)
{
    return Math.Sqrt(Sqr(c.R - p.R) + Sqr(c.G - p.G) + Sqr(c.B - p.B));
}

private static int Sqr(int x)
{
    return x * x;
}
If we add in a rounding step to chop off the low-order bits (at this resolution, it rarely matters) and add in some caching, rendering performance is actually not terrible. Here’s an example of those same peaches, rendered with color blends:
Maybe not quite as good as the Ruby-On-Linux version, but pretty impressive considering the limitations of DOS. Using library calls, it’s just about the same length as the Ruby version:
using System;
using System.Drawing;

namespace ConsoleImage.Viewer
{
  class Program
  {
    static void Main(string[] args)
    {
      Bitmap bitmap = (Bitmap)System.Drawing.Image.FromFile(args[0]);

      ConsoleImage.Draw(bitmap);
    }
  }
}
I have started a little library to play with this idea of rendering images to the windows console. It does a fair bit already in terms of resizing images, cropping images, animating GIFs and rendering images at various points in the console window. I don’t want it to do too much more than that, though. The world clearly has no need for DOS-based image editing or anything crazy.